
IMPORTANT: this article is related to nopCommerce version 4.30 and below. Please check our documentation if you're interested in details about running nopCommerce on Linux (for the latest versions of nopCommerce).
Welcome to part 2 of Running nopCommerce on Linux.
Before we begin, please read part 1 of this tutorial if you have missed it. In part 1, we went over the basics of installing nopCommerce on Linux in detail. And created a basic setup of nginx and MySQL to run nopCommerce on Linux.
In this part of tutorial, you will learn how to:
- Install a free SSL certificate for your nopCommerce store.
- Run multiple instances of nopCommerce on the same server.
- Convert an existing nopCommerce application that is running on Microsoft SQL to MySQL.
- Deploy a custom-developed application. How to build DLLs in Visual Studio that will run on Linux.
Let's start with a SSL certificate installation.
Free SSL Certificate installation for .NET project
In MobaXterm, run the following command in the terminal to install Certbot.
sudo apt install certbot python3-certbot-nignx
You will be prompted to confirm if you want to install Certbot. Press "Y" to confirm.

If you already have it installed like I do, you will see this screen instead.

If you have multiple nopCommerce instances, you will need to do SSL binding for each individual instance.
Now, let's have a look at the installations I have by going to the default server.
cd /var/www/
And running the "ls" command.

As you can see, I have four installations here.
For this tutorial, the application I want to bind SSL to is "nop430-demo". To do that we need to look for the hostname in the nginx configuration file for that application.
Let's go to the "sites-available" folder.
cd /etc/nginx/sites-available
And run the "ls" command.

Since I have named my configuration file after the application it's for, I can tell at a glance that "nop430-demo" is the file I'm looking for. Let's open it in Nano.
nano nop430-demo
Under "server", "server_names" contains the hostnames we are looking for.

The reason I have more than one hostname is because my application is a multi-store installation. With NopCommerce it is possible to have more than one store in an installation. You can even have multiple installations of different instances hosted on the same Linux hosting (more on this in the next section). Here's an example to illustrate the hierarchy:

As you can see, it is possible to have two instances running, each containing a multi-store installation. Additionally, it is also possible to run different versions of nopCommerce in each separate instance. In the example above, Instance (1) is running nop4.40 while Instance (2) is running nop4.50.
Anyway, coming back to the hostnames. Now you can tell Let's Encrypt the domain names we want to bind the SSL to. So I will select the hostnames.

And then left-click on the selection to copy. Do not press Ctrl+C to copy! In MobaXterm, pressing Ctrl+C will interrupt or kill the current task or program.
Let's exit Nano by pressing CTRL+X.
Next, you will use Certbot which we installed earlier to communicate with Let's Encrypt and complete the SSL binding. The command you need use looks like this example:
sudo certbot --nginx -d example.com -d www.example.com
We have to enter the domains we want to bind with a "-d" followed by a space in front of each domain. So I will type out the command, right-click to paste the hostnames, and then add "-d" followed by a space before each hostname. The resulting command looks like this:
sudo certbot –nginx -d nop430-demo.pronopcommerce.com -d nopmoka-demo.pronopcommerce.com -d nopwinery-demo.pronopcommerce.com
If your setup is not a multi-store setup, you should only have one hostname. But do note that if you wish to bind both the WWW URL and the non-WWW URL, you will have to enter both domains in the command like so:
sudo certbot --nginx -d yourstore.com -d www.yourstore.com
Since all my hostnames are subdomains, I don't have any WWW URLs to add. I will proceed by pressing Enter to execute the command.
Certbot will start running and prompt us for an email address.

The email address you enter here will be used by Let's Encrypt to send you notifications about your SSL renewal and security issues.
After entering the email address, press Enter to submit.
Next is Let's Encrypt's terms of service. Press "A" to agree to the terms of service.

Following that we are asked if we want to share our email address with the Electronic Frontier Foundation. This is optional. I do not want to, so I will press "N" for no.

Certbot will continue running for a while.
Lastly, Certbot will ask if you want to redirect all HTTP traffic to HTTPS. Depending on your needs you may want to do that. If so, press "2" and hit Enter. For me, I don't want Certbot to make any changes. So I will press "1" for No, followed by Enter.

Certbot will proceed to finish up. And you should see a message that says your SSL has been successfully enabled.

The next step is to make a small change to the appsettings.json file for your nopCommerce website. This is important and will result in a redirect loop if you do not do it.
Let's go to the root folder of the website, in my case it is "/var/www/nop430-demo".

Then you will open the appsettings.json file in Nano.
nano appsettings.json
In the "DOTNET_URLS" section, look for "UseHttpXForwardedProto".

The default value for "UseHttpXForwardedProto" is false. We need to change that to true.

Press Ctrl+S to save the file and Ctrl+X to exit Nano.
After editing appsettings.json, we need to restart our app for the changes to take effect. The restart command is:
systemctl restart yourappname.service
For my case it is this:

Press Enter to run the command. It can take around two minutes for the service to restart depending on your VPS. Using MobaXterm, you can tell it has finished restarting when the CPU usage has stopped spiking.
Once successfully restarted, we need to tell nopCommerce to enable SSL for our stores. Log in to the nopCommerce Admin page or refresh it if you have it opened. And then go to Configuration > Stores.

Click on Edit for the store that you want to enable SSL for. For my case, I will have to edit both NopWinery Demo and NopMoka Demo. I'll start with NopWinery Demo and click the Edit button for that store.
In the Edit Store Details page, change the store URL from HTTP to HTTPS.

Then tick the "SSL enabled" checkbox.

And then click Save.
I made the same changes to my other store. If you run a multi-store installation like me, you will have to edit each of your stores to enable SSL for them.
With that, we have successfully installed and enabled our free SSL certificate on our nopCommerce stores.
Run Multiple eCommerce Instances on the Same Server
In this section, we will go through the setup required to run several instances of nopCommerce on the same server. It is a convenient way of running any combination of nopCommerce versions. You can have some instances running the same version and others running different versions on the same server.
In this example, I have three instances of nopCommerce installed.

The first instance I set up is nop430-demo. I left it as it is and did not change the listening port. Therefore, nopCommerce will by default listen on port 5000.
Now, let's pretend I'm in the process of setting up the next instance which is nop430-1-demo. And I have completed all the steps in part 1 of this tutorial. At this point, nop430-1-demo is ready but cannot run because the first application is also listening on the same default port 5000.
As part of setting up a new instance in part 1 of this tutorial, we had to create a nopCommerce service for nginx to route requests to. Let's go to the directory we placed the .service file in.
cd /etc/systemd/system/
Do refer to the previous tutorial if you are unsure of anything. It is important that you understand and follow all the steps in part 1 of this tutorial.
I will run the list command.
ls

Since the configuration file is named after the application it is for, we can easily spot it in the list: nop430-1-demo.service. Let's open the file in Nano.
sudo nano nop430-1-demo.service
Now we just have to add this line to specify the listening port.
Environment=ASPNETCORE_URLS=http://localhost:5031

In the previous tutorial, it was not necessary to set a specific listening port because there was only one nopCommerce running. It will automatically use the default port 5000. However, we are now adding a second instance to the same server. And only one application can be on a port at a time. So it is necessary to assign a different port to the additional instance.
In my case, I have assigned nop430-1-demo, my second application to listen on port 5031. This leaves my first application to listen on the default port 5000.
Press Ctrl+S to save the changes and Ctrl+X to exit Nano.
The next step is to start the service with this command.
sudo systemctl start nop430-1-demo.service
nop430-1-demo should now be listening to port 5031. We can run another command to check which application is listening on which port.
sudo netstat -tunlp

This will list all the listening ports and the applications that are listening on them. What I am interested in are the applications with the program name containing "dotnet" which means it is a nopCommerce application. As you can see, my nop430-1-demo is listening on port 5031.
Repeat the above steps when installing additional instances on the same server. The applications will run fine as long as each application is assigned its own listening port.
Convert an Existing eCommerce Application from MS SQL to MySQL
Converting the database from MS SQL to MySQL is a crucial step when moving an existing nopCommerce application from Windows hosting to Linux hosting. I have tested a few software tools and have found MSSQL-to-MySQL by Intelligent Converters to be the most stable and straightforward.

But what works for me may not work for you. Database system conversion is not an easy task. Especially if your database is a customised version of nopCommerce. You will have to test it to see if it works for your version of database and application.
For this tutorial, I will be using MSSQL-to-MySQL. It is not expensive and there are discounts available if you are thinking of getting it. I will explain more on how to get discounts later.
Let's start by opening MSSQL-to-MySQL. We will be greeted by the migration wizard.
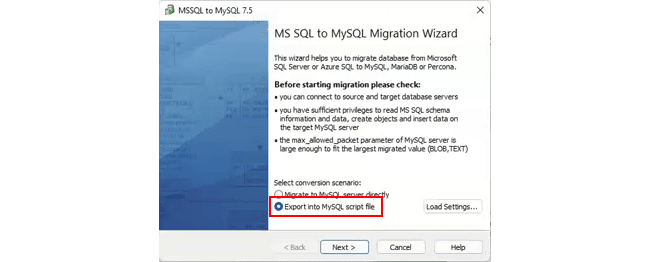
Select "Export into MySQL script file" and click “Next”.
MSSQL-to-MySQL will then ask for information to connect to your MS SQL server.
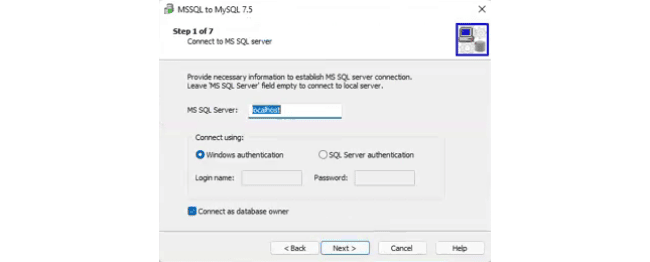
It is my practice to work on a local database. Even for a production website where the database is hosted on a live server, I will backup and restore the database into my local server and make changes locally. It is much faster this way. So I will leave it as “localhost” to connect to my local server. And then click “Next”.
On the next page, I will leave the default settings here unchanged except for "Insert 'CREATE TABLE' statements".
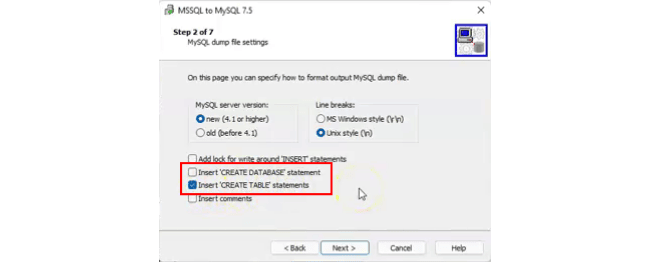
When enabled, the script will create all the tables when executing on the MySQL database. If you have not created a MySQL database in your destination server, you can tick the "Insert 'CREATE DATABASE' statement" and have the script do it for you. I will leave it unchecked as I have already created a MySQL database on my server.
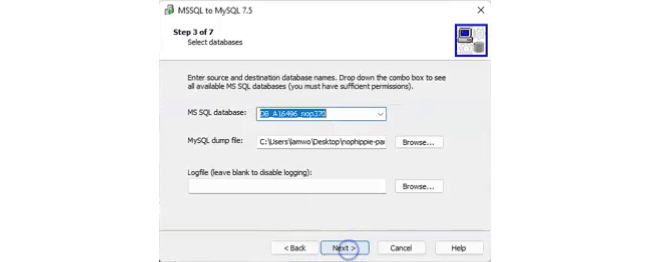
Next, we have to choose the MS SQL database that we want to convert and also where we want to save the MySQL script file to.
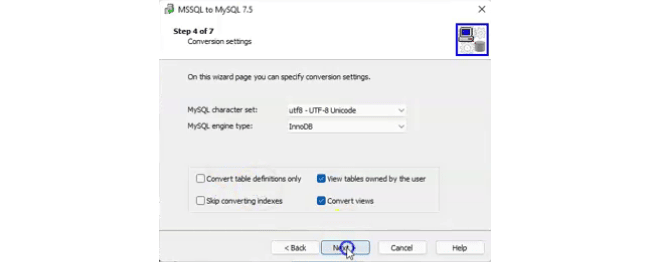
Following that is the Conversion Settings page. Leave the default conversion settings unchanged and click “Next”.
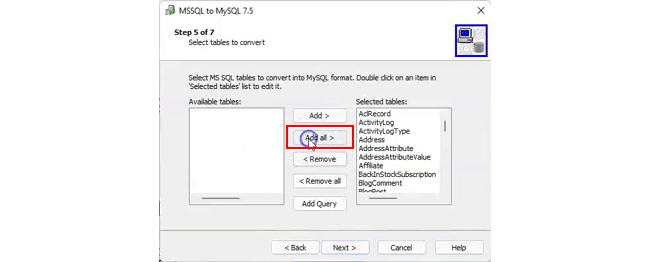
On the next page, select all the tables to be converted. Click on "Add All >" and then click “Next”.
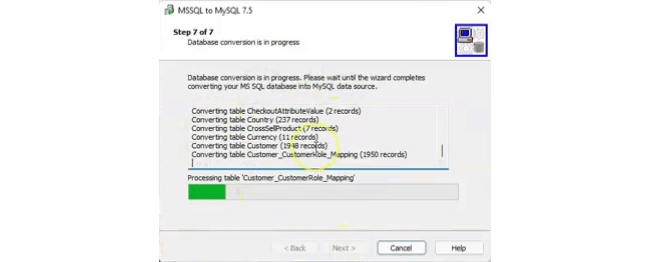
Now MSSQL-to-MySQL will start converting the database and generate the MySQL script file.
Once the conversion is done, we will have a MySQL script file that looks like this:

The next step is to upload this script file to the server and execute it on the MySQL database.
I will open the SSH terminal in MobaXterm and navigate to the folder I want to upload the MySQL script file to. To keep things organised, I usually upload files to the App_Data folder of the application I'm working on. Right now, I am working on the MySQL database of my nop430-1-demo. So I will move to that directory.
cd /var/www/nop430-1-demo/App_Data
Make sure the "Follow terminal folder" in the SFTP tab is enabled. And check if the path in the SFTP is correct.

Then just drag and drop the script file into the SFTP tab.
Once the upload is complete, go back to the SSH terminal. In the folder that contains the script file, run this command:
mysql
This will launch the MySQL process on Linux.

I have already created a MySQL database called "import_demo" to receive the data. So I will select it as the database I want to import into by entering the command "USE" followed by the database name.
USE import_demo
Press Enter to run the command. Then you will see "Database changed".

As a reminder, it is crucial that you are running the MySQL shell in the same directory the uploaded script file is in. We can now tell MySQL to execute the script file on my selected database with this command:
source nophippie-partial.sql
Just replace "nophippie-partial.sql" with the name of your script file when you are trying this. Press Enter to run the command.

When all the queries are executed, the database has been successfully imported. We can quit the MySQL shell by typing "quit" and pressing Enter.

Now we need to check and make sure that the dataSettings.json is pointing to the database we have just imported. The location of dataSettings.json is in our nopCommerce application’s App_Data folder.

Since I am already in the correct directory, I can open the file in nano.
sudo nano dataSettings.json
Under DataConnectionString, make sure it is pointing to the database we have just imported.

And we are done. That is how to convert a database from MS SQL to MySQL from start to finish.
If you are interested in a discount for MSSQL-to-MySQL by Intelligent Converters, you can go to their "How to Get a Discount" page. Also, I can organise a group purchase deal to get 50% off under their "for 3rd and each following purchase" option. Just send me your email and we can purchase all the licences in one go.
Deploy a Custom-developed Application
Whether you are developing a custom version of nopCommerce or just making slight changes, modifying any C# part of the code will require the application to be compiled again before uploading to the Linux server. Specifically, you have to compile for Linux. Because code compiled for Windows will not run on Linux servers.
Let's start with the modified code in Visual Studio. In the Solutions Explorer window, select the Nop.Web project.
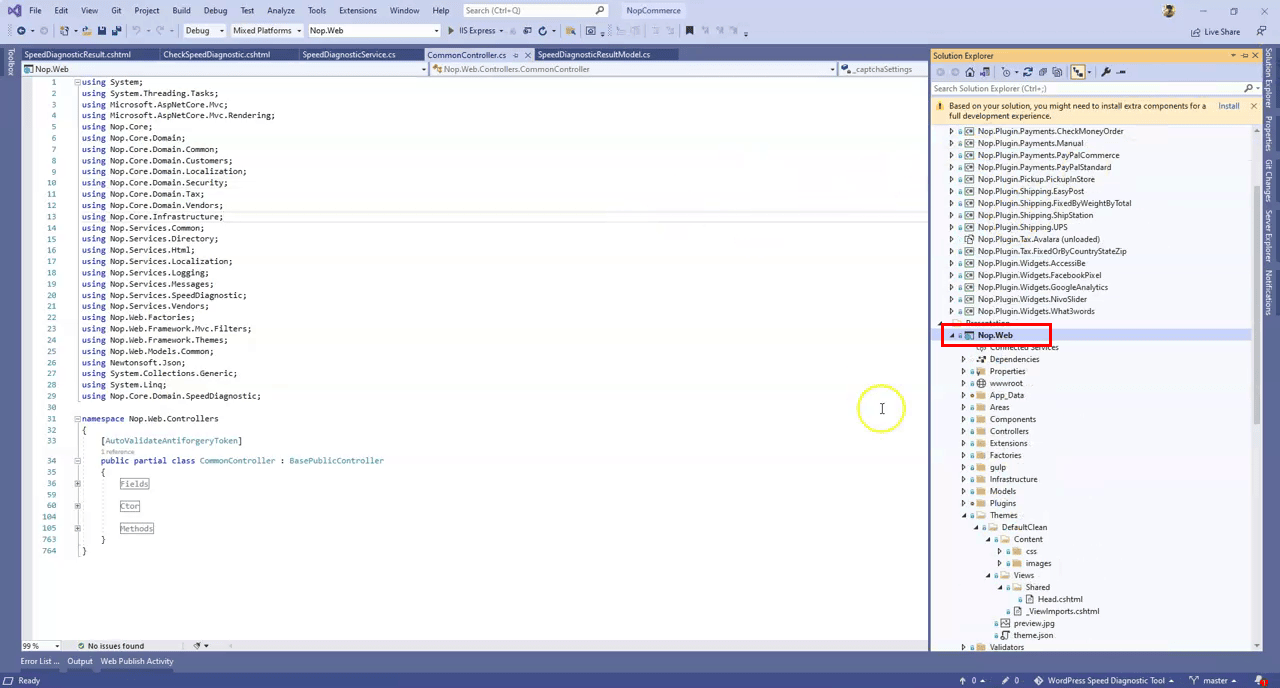
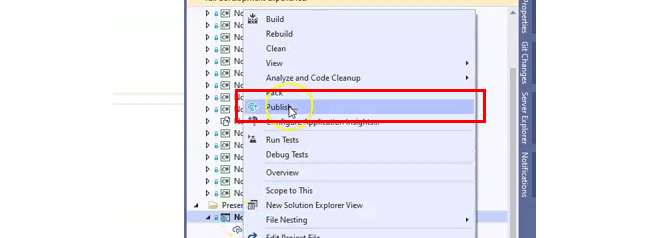
Right-click on Nop.Web. And in the context menu that appears, click "Publish".
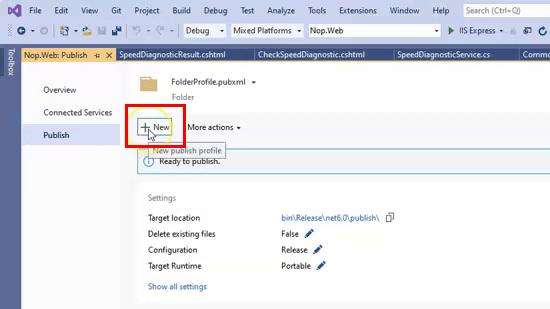
Let's create a new publish profile by clicking on "New".
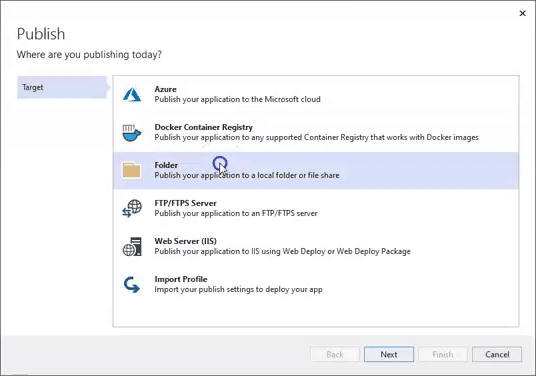
A window will pop up. Select "Folder" as the Target and click "Next".
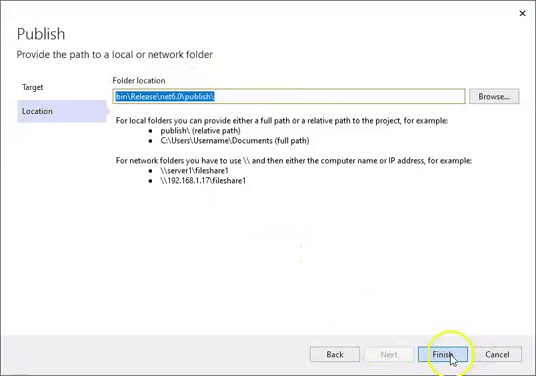
On the next page, do not change the Folder Location. Click "Finish".
Now we can configure the publish profile for Linux. Click on the pencil icon to edit Target Runtime.
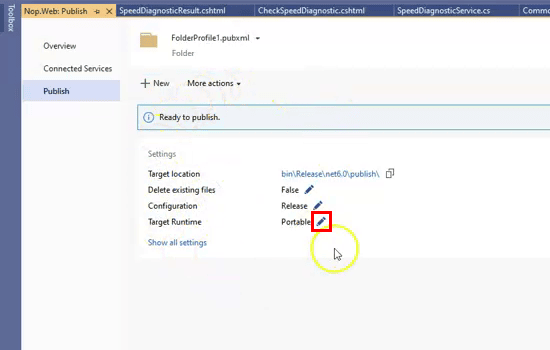
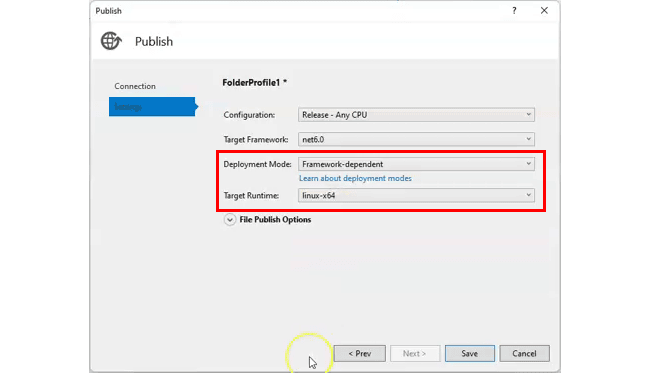
In the window that pops up, set Deployment Mode to "Framework-dependent". And change Target Runtime to "linux-x64". As a side note, most VPS use linux-x64. Click "Save".
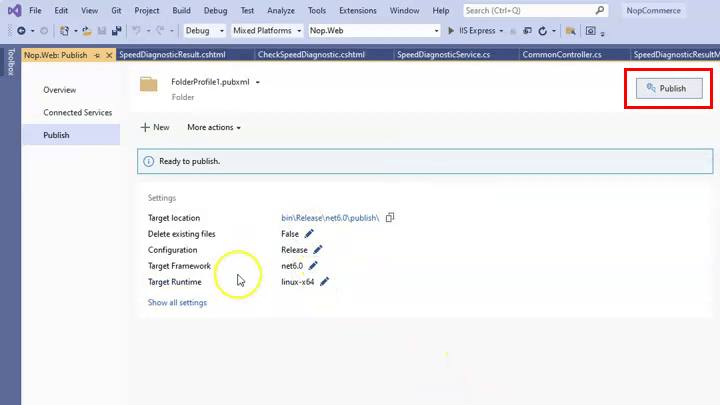
Now click "Publish".
Once it finishes publishing, a folder path containing the published files will be provided.
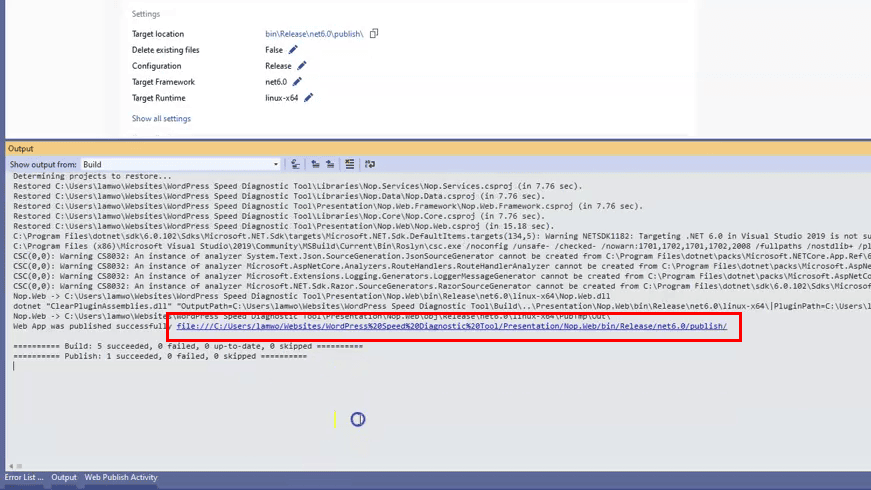
It is always in the "bin" folder of the project you are working on. Unless you have changed the Folder Location for the publish profile. Then it will be in the folder you specified.
As you can see the published files are in the "bin" folder. In Release > net6.0.
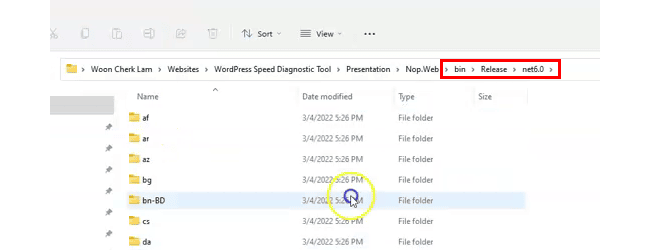
We do not have to upload everything. We only need to upload the files that we have made changes to.
For this tutorial, let's assume that I made some changes to the code in Nop.Web. Therefore after publishing, I only need to upload the Nop.Web.dll file to my server.
As usual, I will use MobaXterm to upload the file. But feel free to use any SFTP client you are comfortable with.
In the terminal, move into the nopCommerce application's folder. For me it will be:
cd /var/www/nop430-1-demo
Now, I'll make sure "Follow terminal folder" is enabled and check if the SFTP path is correct.
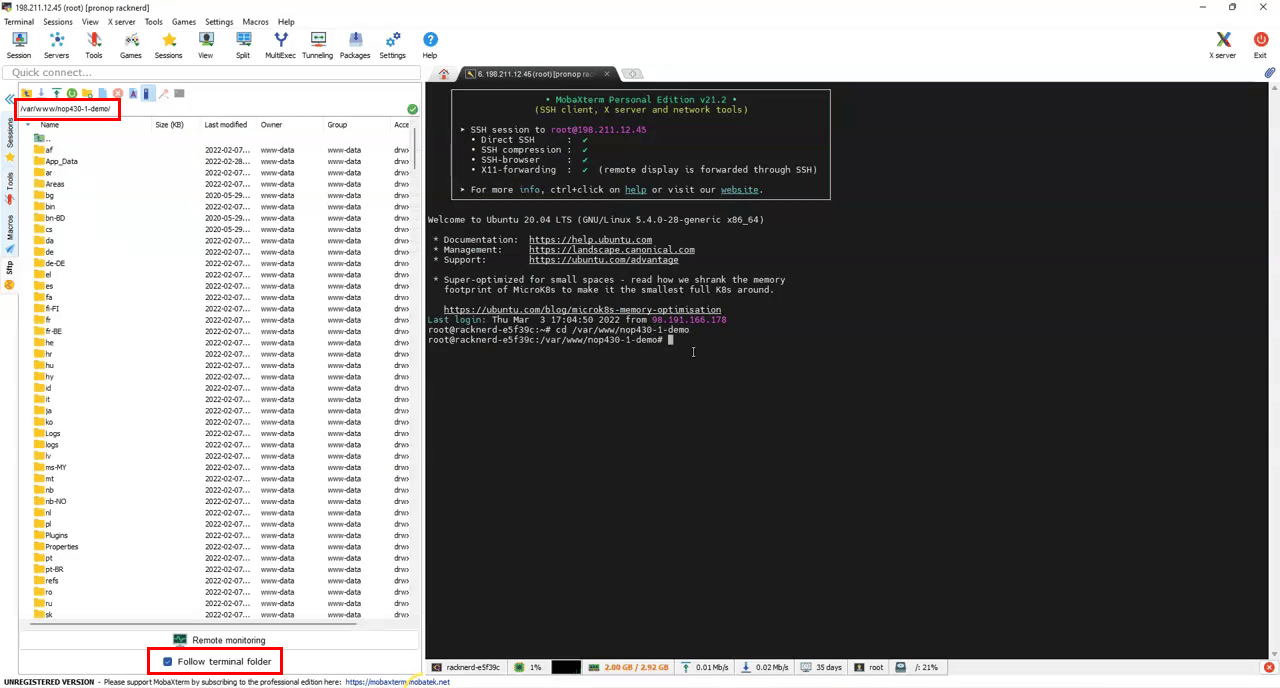
Then I will drag and drop the Nop.Web.dll file into the SFTP tab.
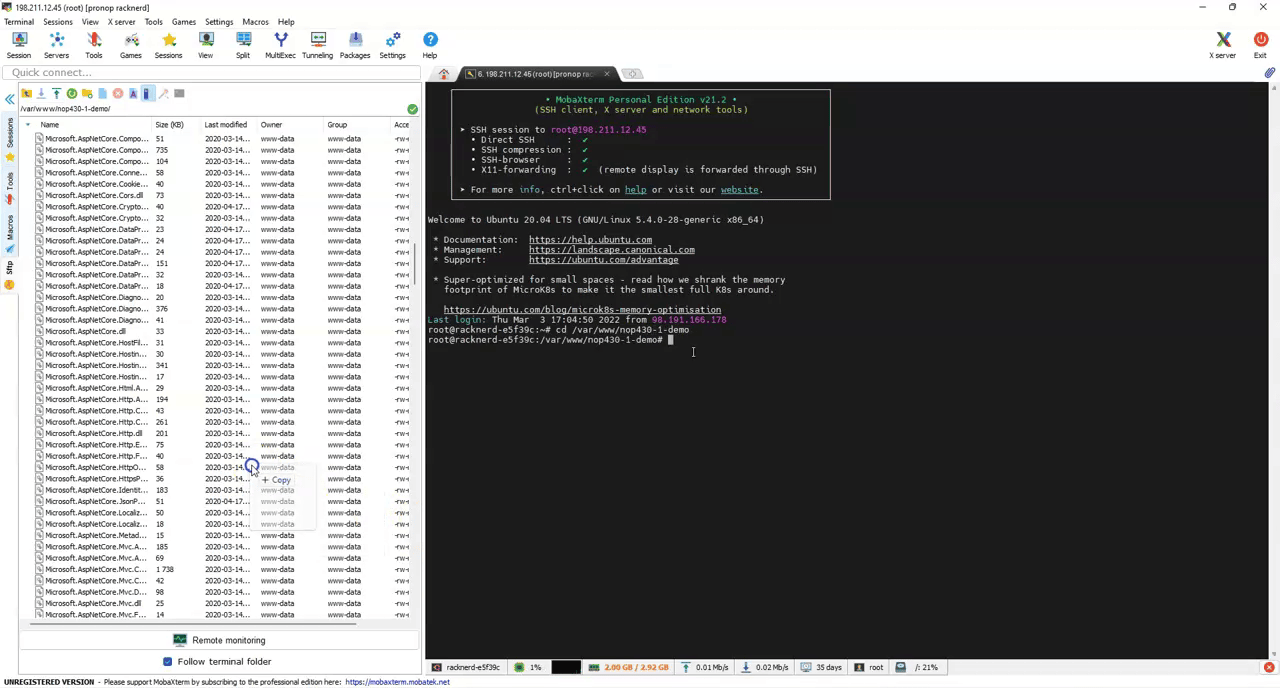
Once the DLL file has been uploaded, we will need to restart the nopCommerce instance. The command to do that is "sudo systemctl restart" followed by your nopCommerce service name. For my case it is:
sudo systemctl restart nop430-1-demo.service
After restarting, nopCommerce will take in the updated DLL file. The custom-developed version of nopCommerce is now deployed and running on Linux.
Conclusion
As you follow these steps, any nopCommerce project may be deployed using Linux operating system. From SSL Certificate installation to deploying customised parts can be easily performed. Moreover, many instances may be run on the same server that hugely optimises costs of creating and managing eCommerce store by nopCommerce. Considering the first part of the tutorial, server expenses may be even less by using suggested Linux VPS, which are usually cheaper than Windows’ ones. Also refer to documentation where you can find more descriptive information about initial settlement of nopCommerce using Linux OS.
Woon Cherk Lam, the author of this tutorial and a nopCommerce’s MVP, is an experienced developer that has created several themes and plugins for nopCommerce. He is an expert in nopCommerce customization, and has recently been researching about the viability of running nopCommerce on Linux. That is why the information, Woon Cherk Lam shares, is valuable for beginners and experienced developers. Check his website: https://www.pronopcommerce.com/
Commenti
Thank you.