
In today’s booming eCommerce landscape, creating an effective mobile app is a key strategy to thrive in the digital marketplace. With numerous top players dominating the online retail industry (like Amazon or Alibaba), emerging businesses need to get an upper hand in their niche.
The question on everyone’s mind is: How to build an eCommerce mobile app that stands out from the competition and is yet cost-effective? For companies and development teams that don’t have thousands of dollars to spare, the task becomes even more challenging.
In this article, the nopCommerce core team will reproduce the process of creating their mobile app that enables a sleek and user-friendly mobile eCommerce experience. The text explores the key features, tech stack, design and architecture aspects involved in building an eCommerce app, using the nopCommerce mobile app case study as a reference.
Steps to build an eCommerce mobile app
Here we won’t dwell on the advantages of mobile apps as they’re quite obvious. Our task is to break down the process of developing an eCommerce app into easy-to-follow steps.
This will be helpful for developers wanting to reproduce the process themselves or those who wish to learn the nopCommerce mobile app from the inside.
Planning and research
Before diving into the development process, it is essential to conduct a thorough analysis of your competitors and the current market trends. This step helps you gain valuable insights into what works well in the industry and identify potential gaps or opportunities for your mobile eCommerce app.
- Competitor analysis: Start by identifying your direct and indirect competitors in the mobile eCommerce space. Analyze their app features, user experience, pricing strategies, marketing tactics, and customer reviews. This analysis helps you understand their strengths and weaknesses and identify areas where you can shine.
- Market trends: Research consumer preferences, emerging technologies, and popular features that users expect from an eCommerce app. This knowledge enables you to align your app with evolving needs and expectations.
Setting clear goals and objectives guide the development process, and helps evaluate the finished mobile eCommerce app. Here are some key considerations:
- Define your target audience: Understand the demographics, preferences, and pain points of your users. This knowledge helps you tailor your app to meet their specific needs and create a personalized user experience.
- Set measurable goals: For instance, your goals could include increasing sales, improving customer engagement, enhancing conversion rates, or expanding the customer base. These goals provide a framework for evaluating the app's performance and success.
- Prioritize features: Focus on core features that provide value to users and align with your unique selling proposition. A user-friendly interface, seamless navigation, secure payment options, product search capabilities, and personalized recommendations are among essential features.
- Consider scalability and future growth: Ensure that your app's architecture and infrastructure can handle increasing user traffic, accommodate new features, and seamlessly integrate with third-party systems, such as payment gateways and inventory management systems.
Choosing the right technology stack
First, a developers’ team should choose a platform/framework on which to build an eCommerce app. The right choice is not reduced to technical aspects and should also consider business needs.
Native vs cross-platform app development
In case of the nopCommerce mobile app, we had two options:
- Creating a native application. Developers need to make two separate apps for Android and iOS. This affects the time required for the product launch and the speed of further updates. The approach is suitable for enterprise-level companies that can afford two development teams (Swift and Kotlin). In this case, the costs will be higher, but the end application will be well adapted to each platform.
- Cross-platform approach. The cross-platform approach utilizes the same codebase for Android and iOS devices. This option is more cost-effective and time-efficient (it can save up to 50% of a company's money and staff resources). However, in comparison with native eCommerce app development, cross-platform applications get some features with a time delay. Still, this gap is insufficient and almost all eCommerce functions can be covered with third-party libraries and plugins.
When planning our work on the nopCommerce mobile application, our main goal was to create a flexible solution that store owners could easily customize and connect to their websites. The other concern was time to market and commercial efficiency.
That’s why we picked the second option as it helped us create a full-fledged product in a shorter time, without compromising on its functionality.
Top functions to seek in a framework
If you choose to go down this way, there are several frameworks you can consider: React Native, Ionic, or Flutter. As for our team, after a lengthy and heated discussion we opted for Flutter.
There has been a lot of hype regarding Flutter lately, but it’s not the main reason behind our choice. See the biggest pros of the framework we utilized:
- A shallow learning curve to master the framework combined with its technical maturity and high adaptability.
- Seamless integration with popular code editors simplifies the process of coding, debugging, viewing the widget tree, and analyzing memory leaks. Flutter has great integration with VSCode (popular among .NET developers).
- Hot reload saves much time and effort by allowing to view the changes made right in the app and thus speeding up the development process. This feature is lacking in native app development.
- Flutter is lightning fast, providing 60 frames per second (FPS). This allows to create mobile applications in Swift (iOS) and Kotlin (Android) close to native ones in terms of performance.
Making performance the key priority
Before starting eCommerce application development, we needed to assess UI rendering performance since this feature requires the maximum resources in the nopCommerce mobile app.
Our main task was to see how fast an advertising slider is rendered with animation. We tracked memory consumption, FPS, CPU load using the GameBench automation interface tool.

For the purposes of testing, the same interface was implemented natively on an Android device using React Native and Flutter. The test time in each case was fixed. For each language, libraries were used for image caching. Overall, the testing conditions were the same.
The results are provided below (the lower the value, the better the performance).
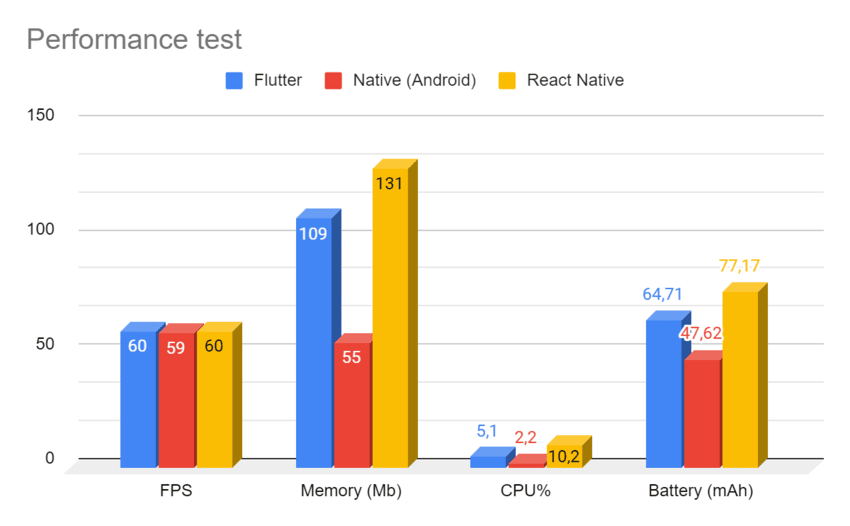
- FPS values almost coincide in all cases. There are no noticeable differences between the declared capability of Flutter and its real indicators
- Memory values show more fluctuations. Flutter requires twice as much memory as native applications, but not as much as React Native
- In terms of CPU, React Native looks like an obvious outsider. The reason for this is the use of a JS Bridge between JS and Native code
- Indeed, battery consumption is better optimized on native Android apps. However, Flutter with its stable indicators is a runner-up.
Even such simple tests show that there are significant differences in the approaches we compared. Still, performance is not a decisive eCommerce mobile app development feature. And Flutter seems to be the best alternative to native programming languages.
Building a scalable architecture
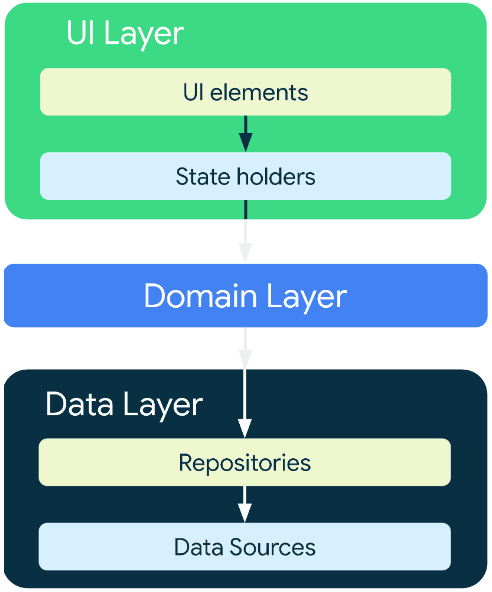
When building an eCommerce app from scratch, it’s crucial to choose the right architecture as it influences the further development of the project, its scalability and code structure, which makes the team's work more transparent and better coordinated.
To avoid cluttered code and facilitate code maintainability/scalability, we built our app’s architecture according to generally accepted standards described in the Android documentation.
The only problem is that it doesn’t consider the specifics of Flutter, so we had to modify the initial architecture and add one more level. Here’s the original three-level structure:
And here’s our version, utilizing Riverpod for state management and dependency injection in Flutter:
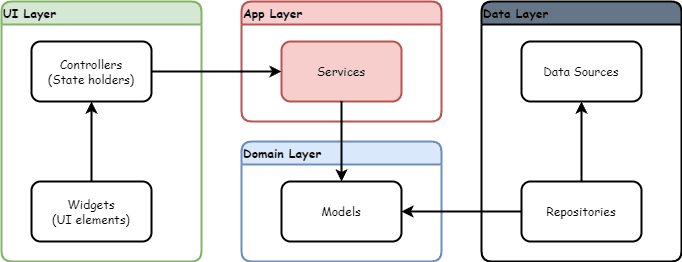
As you can see, the new architecture resembles the canonical one but we slightly redistributed the main levels. Now let's dwell on the changes made.
- Domain Layer. This level describes domain models that can be changed by services at the Application Layer and also filled with repositories at the Data Layer. These models are applied to the business logic objects that you work with through the repositories.
- Application Layer. It fulfills similar purposes as the Domain Layer from the initial Android architecture. This level hosts service classes that describe the methods used by controllers. This is extremely useful when multiple widgets manage the same logic or the logic depends on multiple repositories. However, the Application Layer is not universally applicable, and controllers can also request data directly from the repositories. If services simply redirect method calls from controllers to the repository, then there is no need for the Application Layer.
Designing the user interface
One more reason for choosing Flutter was its large widget library that allows to create a user-friendly interface with minimum effort. Since Flutter has its own rendering engine called Impeller, you can be sure that your mobile app for eCommerce will look equally beautiful on any device.
The nopCommerce application is based on Material 3 (Material You). It is the latest version of Google's design system that has reimagined component renderings, introduced new colors and new animations – all these features are already available in Flutter.
At the same time, Material 3 offers reference tokens for storing styles, fonts and animation values. This opens up the possibility to use the same style values in both design files and code.
We pursued the goal of creating an eCommerce app that will look the same on any device and, most importantly, will provide a unified style management system for these components. That’s when design tokens come in handy.
To create design tokens, we need the Material Theme Builder. It generates a theme with default colors and styles. Then we can create a custom theme on its basis.
Basically, there are two ways to determine brand colors:
- To specify base colors manually
- To use dynamic colors, i.e. a color scheme will be selected on the basis of the image provided (for example, your company’s logo).
After the base colors are selected, the entire palette of tokens is generated according to the concept of Material You, but you can always make changes to fulfill your wishes.
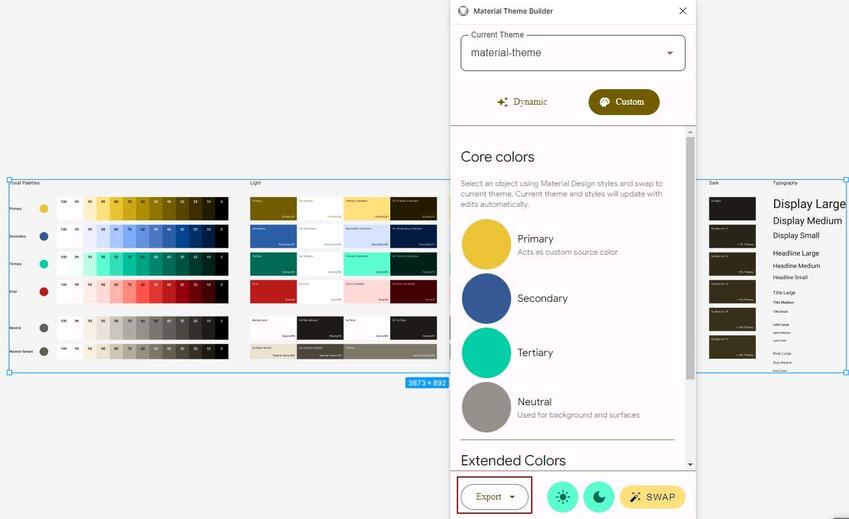
Now it is possible to manage tokens for different application modes (Dark mode/Light mode), which makes the user interface incredibly flexible, and allows you to change the style of the entire application on the go.
Here’re the main benefits you will unlock using design tokens:
- No need to study platform-specific design guides, just download tokens and apply Material 3 in both design and development
- The ability to quickly rebuild your application with a new design
- The ease of maintaining and updating styles.
Following these simple tips, you won’t need to wonder how to make your eCommerce mobile app visually appealing on any device and, if needed, how to redesign it with minimum effort.
Ensuring the security of mobile app
To protect all the transmitted data, the nopCommerce mobile app uses Bearer Tokens. The token is issued only to an authorized user and then facilitates the exchange of requests between the client (mobile application) and the server.
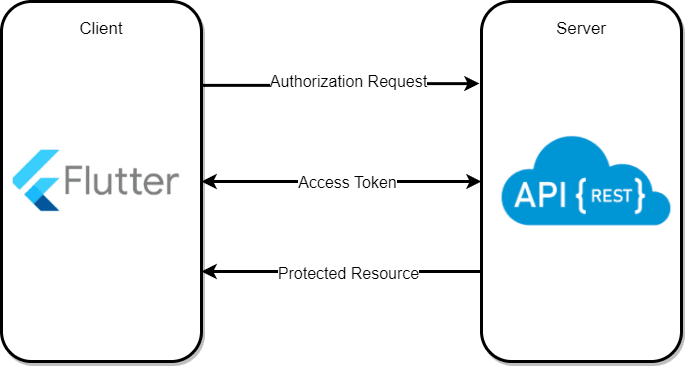
The server-side token can be revoked, and then clients have to go through the authorization procedure to receive a new token.
But how are tokens stored on the client side? In fact, the use of a token does not require proof of ownership from the bearer, and it is very important to keep this information under control. For these purposes, Flutter uses secure local storage.
Local storage keeps user data until the application is uninstalled. But different technologies are used for different mobile operating systems:
- Android supports the Advanced Encryption Standard (AES). The secret key is encrypted using the RSA algorithm, and the key is stored in the KeyStore.
- iOS utilizes KeyChain, i.e. a secure storage used to access the application's cryptographic keys.
This means that our eCommerce mobile app applies the best security practices on any platform, making the security token inaccessible to prying eyes. These security measures help maintain user confidence in the product.
Automating processes & updates via API
How to create an app for an eCommerce website that gets regular automatic updates? The obvious answer is to connect them through an API.
Our mobile app is designed to be seamlessly integrated with the nopCommerce ecosystem, be it a CMS, additional extensions or official Web API plugin. In case of the latter, we decided to include it into the mobile app package with the source code available.
When it comes to interacting with an API, it’s often a challenge to implement an access client and keep it up to date. To simplify the process of making changes/adapting to the new API, make sure that your API is described according to the OpenAPI 3 specification.
This notation allows to store the entire description of your API in the json format and to generate a client in the necessary language using the OpenAPI Generator. Since our mobile app is built with Flutter, the client should be generated in Dart using the dart-dio Generator (see the Documentation for the dart-dio Generator).
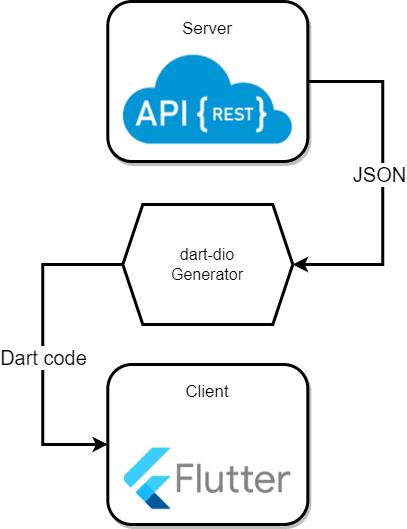
Once the client is set up, it will be generated as a package and we just need to indicate that we will use it in the app. Thus, we quickly got all the methods supported by the API. It is only required to “teach” the repositories to work with these methods.
Next, when the API methods change their signature, or other structural changes are made, you will be able to rebuild the client.
In addition to the “Web API Frontend” plugin, you can manage some application settings using the “nopCommerce mobile app” plugin right from the admin panel of your nopCommerce webshop. For example, you can set up a slider on the main screen (specify what products to showcase) or transfer certain settings to the mobile application.
Conclusion
If you’re wondering how to make an eCommerce app for your online store, we hope this guide will be helpful for you. We followed all the major steps made in the development process, so you can get valuable insights into the final product.
However, you can further save your time and resources not by recreating the steps described above but by getting the official nopCommerce mobile app with the source code and easily customizing it to your own eCommerce website. It won’t take your development team more than a day to connect and get everything ready.
Keep an eye on our future updates and check out our mobile app documentation.